Phone Provisioning
Phone provisioning lets you deploy desk phones in bulk: define settings once in a profile, register each phone by MAC address, and let the phone pull its configuration from QVOICE Platform over HTTPS.
Resellers and technical administrators use this area to roll out Yealink, Polycom, Grandstream, Yeastar FXS gateways, and other supported models without manual per-phone programming.
Where to find Provisioning
In the QVOICE Platform Admin Portal:
- Open Provisioning.
- Create a Profile (manufacturer, model, SIP settings, optional ACL).
- Optionally create a Buttons layout (shared key map, no Line keys) and apply it on each phone.
- Create a Phone device for each physical phone (MAC address, profile, user extension).
- Unlock the phone device when you are ready for the phone to download config.
- Point the phone at the correct provisioning URL (see Supported phones below).
flowchart LR
  profile[Create profile] --> buttons[Optional Buttons layout]
  buttons --> phone[Add phone by MAC]
  phone --> user[Assign user extension]
  user --> unlock[Unlock phone]
  unlock --> url[Set provisioning URL on phone]
  url --> pull[Phone downloads config]
Provisioning server
Most manufacturers use HTTPS on port 9443. Replace {manufacturer} with the vendor path from the table below.
| Setting | Value |
|---|---|
| Protocol | HTTPS |
| Server | Your platform hostname (same host as https://qvoice.net:9443) |
| Port | 9443 |
| Path | /provisioning/{manufacturer} |
Example URL pattern:
https://qvoice.net:9443/provisioning/yealink
White-label partners use their own portal hostname; the path and port stay the same.
Portal setup (all manufacturers)
What to configure
| Step | Action |
|---|---|
| Profile | Choose manufacturer and model, set SIP transport/port, timezone, and optional HTTP/ACL rules |
| Phone device | Enter MAC address (no colons), select profile, assign user, optionally apply a Buttons layout |
| Unlock | Enable provisioning for that MAC. Choose how long the phone stays unlocked (default 30 min, maximum 24 hours). Locked phones do not receive config |
| Lock | Close the unlock window early for selected phones. They show as Expired until you unlock them again |
| Phone GUI | Set auto-provisioning / config server URL (vendor-specific screens below) |
Good to know
- Each phone MAC must be unique in the account.
- Profiles can be reused across many phones of the same model.
- Use Preview config in the portal to verify generated settings before unlocking. A live linked Buttons layout is included in that preview the same way it is written to the phone.
- Buttons layouts (Provisioning → Buttons) can be applied to many phones. Line keys stay on the phone. Other keys come from the layout. A BLF for a user that already has a Line on that phone is dropped. Choose Compact unused keys (default) or Keep button positions. Linked phones pick up layout changes on the next provision. Do not reboot them. You cannot delete a Buttons layout while phones still use it.
- Unlock asks how long the phone stays unlocked so it can download config. The default is 30 min. The maximum is 24 hours.
- Lock on selected phones closes that window immediately. Already paired phones stay paired.
- Yeastar TA FXS gateways use the gateway MAC (one portal Phone per device). Model must match FXS port count (for example TA800 = 8 ports). FXO models (TA410, TA810, TA1610) are not supported.
- HTEK phones also support legacy TFTP provisioning on port 60069 if HTTPS is not used.
Buttons layouts
Buttons is a named key layout you apply to many phones. It is a live link, not a one time copy.
- Create layouts under Provisioning → Buttons. Line keys are not allowed there.
- On the phone, keep per phone Line keys, or choose Apply buttons profile. Line keys stay editable. Layout keys are read only.
- A BLF whose user already has a Line on that phone is dropped (self BLF).
- Unused keys on the layout: Compact unused keys (default) closes the gap. Keep button positions leaves an unused slot so later keys stay aligned.
- Saving a layout does not reboot phones. They pick it up on the next provision. Preview config uses the same merged key list.
- You cannot delete a layout while phones still use it. Unlink them first.
- The merged list is truncated to the model key count.
Import phones from CSV
Use Provisioning → Phones → Import to create or update many phones and their buttons from one CSV file. The button is shown to administrators who can add phones.
Not the Download format
The import file is not the file produced by Download. It uses its own 13-column format, described below.
To start from a working file, click Download Template in the Import panel. It downloads phones-import-template.csv with the header and one example phone (a template row, then a Line, a BLF and a speed dial). Replace the MAC, profile, extensions and device name with your own.
File format
- Comma-separated. In Excel use Save As → CSV (Comma delimited) or CSV UTF-8. A file separated with semicolons is rejected.
- The first line is the header. It must contain these 13 column names, in this order, spelled exactly like this:
MAC,Template,Note,Account_Label,Button_Location,Button_Number,Button_Type,Button_Label,Button_Ext,Button_Line_Device,Button_Page_IP,Button_Value,Reboot
- Every row has 13 fields, including the empty ones. A row with a different number of fields stops the whole import before anything is saved.
How rows are read
Rows are grouped by MAC address and processed in file order. A phone is described by one template row followed by any number of button rows.
| Row | Columns to fill | What it does |
|---|---|---|
| Template row | MAC, Template, optionally Note and Account_Label |
Creates the phone if the MAC is new. If the phone already exists, it sets the profile, note and account label and clears all its keys, expansion keys and page listen entries. The same row can also carry the phone's first button, when Button_Location, Button_Number and Button_Type are all filled; otherwise its button columns are ignored. |
| Button row | MAC, the Button_* columns, Template left empty |
Sets one button on the phone. |
Put the template row only once per phone, first. A second template row for the same MAC clears the buttons set before it. A button row for a MAC that does not exist, with no template row before it, fails.
Columns
| Column | Value |
|---|---|
MAC |
The phone MAC address, required on every row, button rows included. Colons, dashes, dots and spaces are accepted. A row with an empty MAC is not imported. |
Template |
The name of an existing profile in Provisioning → Profiles, exactly as it is shown there. |
Note |
Phone note (template row). |
Account_Label |
Account label shown on the phone (template row). |
Button_Location |
keys, expansions or page_listen. |
Button_Number |
Position of the button within that location, starting at 1. |
Button_Type |
Line, BLF, Speed Dial, Page, Park, Unconfigured, Custom, XML_Browser or XML_Browser_Custom. Not case-sensitive. |
Button_Label |
Text shown on the button. For a BLF left empty, the user's name is used. |
Button_Ext |
Line and BLF: the user's extension. Speed Dial: the number to dial. Page: the paging number. |
Button_Line_Device |
Line only: the name of a SIP device that belongs to the user in Button_Ext, as shown in the portal. Case, spaces and punctuation are ignored, so Desk Phone and deskphone are the same name. Devices of other users with the same name are not considered. |
Button_Page_IP |
Page only, required: the paging IP address. |
Button_Value |
Park: the park slot. Custom and XML browser types: the value. |
Reboot |
1, true, yes or reboot on any row of a phone reboots the devices of its Line keys once, after all its rows are saved. Leave empty otherwise. |
Example
One phone with a Line key, a BLF and a speed dial. This is the file Download Template produces. Replace the MAC, profile name, extensions and device name with ones that exist in your account.
MAC,Template,Note,Account_Label,Button_Location,Button_Number,Button_Type,Button_Label,Button_Ext,Button_Line_Device,Button_Page_IP,Button_Value,Reboot
AABBCCDDEEFF,Example Profile,Reception desk,Reception,,,,,,,,,
AABBCCDDEEFF,,,,keys,1,Line,Reception,1001,Desk Phone,,,
AABBCCDDEEFF,,,,keys,2,BLF,,1002,,,,
AABBCCDDEEFF,,,,keys,3,Speed Dial,Support,5551234,,,,
Editing in Excel
Excel drops leading zeros from numbers such as 0800123456 when it saves a CSV. Format the Button_Ext column as Text before typing them, or check the file in a text editor before importing.
Results
After Send the modal shows how many phones (MAC addresses) were processed, succeeded, failed and rebooted. View Details lists the reason for each failed MAC, such as a profile, extension or device that was not found. A failed row stops that phone: rows of that phone saved before it are kept, it is not rebooted, and the other phones are still processed. A row with an empty MAC cannot be matched to any phone: it is listed in View Details as Row <n> (the row's position in the file, the header not counted), and a template row without a MAC is counted as a failed phone.
Supported phones
The portal supports the manufacturers and models below. Models marked HTTPS auto pull configuration from the provisioning server when unlocked. Portal template models are supported for profiles, button maps, and config preview; apply the generated file on the phone using the vendor’s usual method (TFTP, HTTP upload, or local import).
Manufacturer summary
| Manufacturer | Provisioning path | Method | Models |
|---|---|---|---|
| Yealink | /provisioning/yealink |
HTTPS auto | T19, T33, T46G, T46S, T46U, CP960, W60P |
| Yeastar | /provisioning/yeastar |
HTTPS auto | TA100, TA200, TA400, TA800, TA1600, TA2400, TA3200 (FXS gateways) |
| Polycom | /provisioning/polycom |
HTTPS auto | IP330, IP331, IP450, IP550, IP6000, VVX101, VVX150, VVX201, VVX250, VVX311, VVX350, VVX400, VVX450 |
| Grandstream | /provisioning/grandstream |
HTTPS auto | GXP-2130, GXP-2135, GXP-2140, GXP-2160, GXP-2170, HT801, HT802, HT814, GRP-2612, GRP-2613, GRP-2614, GRP-2615, GRP-2616, GRP-2624, GRP-2634, GRP-2636, GRP-2650, GRP-2670 |
| Fanvil | /provisioning/fanvil |
HTTPS auto | X1SP, X3SG, X5U, X6U, I10V |
| Htek | /provisioning/htek |
HTTPS auto (TFTP optional) | UC803, UC903, UC923, UC924, UC926 |
| Mitel | /provisioning/mitel |
HTTPS auto | 6731, 6375, 6867, 6865, 6869 |
| Cisco | — | Portal template | 7912, 7940, 7960, 7962 |
| 4G IP Phone | — | Portal template | S01 |
Expansion modules
These models support optional expansion key modules in the portal button editor:
| Manufacturer | Models |
|---|---|
| Polycom | IP550, VVX311, VVX400 |
| Yealink | T46G, T46S, T46U |
| Cisco | 7940, 7960, 7962 |
| Fanvil | X3SG, X5U, X6U |
| Mitel | 6731 |
Yealink
Provisioning URL: https://qvoice.net:9443/provisioning/yealink
How to set up
- Create a Yealink Profile and Phone in the portal; assign the user and unlock the device.
- On the phone: Settings → Auto Provision (or equivalent).
- Set server to your platform hostname, path
/provisioning/yealink, port 9443, protocol HTTPS. - Reboot or trigger provisioning.
Suggested screenshot: Yealink web GUI — Auto Provision page with HTTPS URL filled in (phone-system/yealink-auto-provision.png).
Polycom
Provisioning URL: https://qvoice.net:9443/provisioning/polycom
How to set up
- Create a Polycom Profile and Phone in the portal; unlock the device.
- On the phone: enable Provisioning Server / Config Server (varies by VVX vs SoundPoint model).
- Point the server at https://qvoice.net:9443/provisioning/polycom (HTTPS, port 9443).
- Reboot the phone.
Suggested screenshots: Polycom web UI provisioning fields; portal Provisioning list with a Polycom phone unlocked (phone-system/polycom-provision-server.png, phone-system/provisioning-phones-list.png).
Grandstream
Provisioning URL: https://qvoice.net:9443/provisioning/grandstream
How to set up
- Create a Grandstream Profile and Phone in the portal; unlock the device.
- On the phone: Maintenance → Upgrade and Provisioning → Config Server.
- Set HTTPS config server path to
/provisioning/grandstreamon port 9443. - Save and reboot.
Suggested screenshot: Grandstream GRP web UI — Config Server path (phone-system/grandstream-config-server.png).
Fanvil
Provisioning URL: https://qvoice.net:9443/provisioning/fanvil
How to set up
- Create a Fanvil Profile in the portal.
- For each phone, add a Phone device bound to that profile.
- Unlock each phone device.
- On the phone web GUI, set Auto provisioning URL to https://qvoice.net:9443/provisioning/fanvil.
- Reboot or apply provisioning.
Suggested screenshot: Fanvil web GUI — Auto provisioning URL field (phone-system/fanvil-auto-provision-url.png).
Htek
Provisioning URL (HTTPS): https://qvoice.net:9443/provisioning/htek
Alternative (TFTP): tftp://{your-hostname}:60069/provisioning/htek
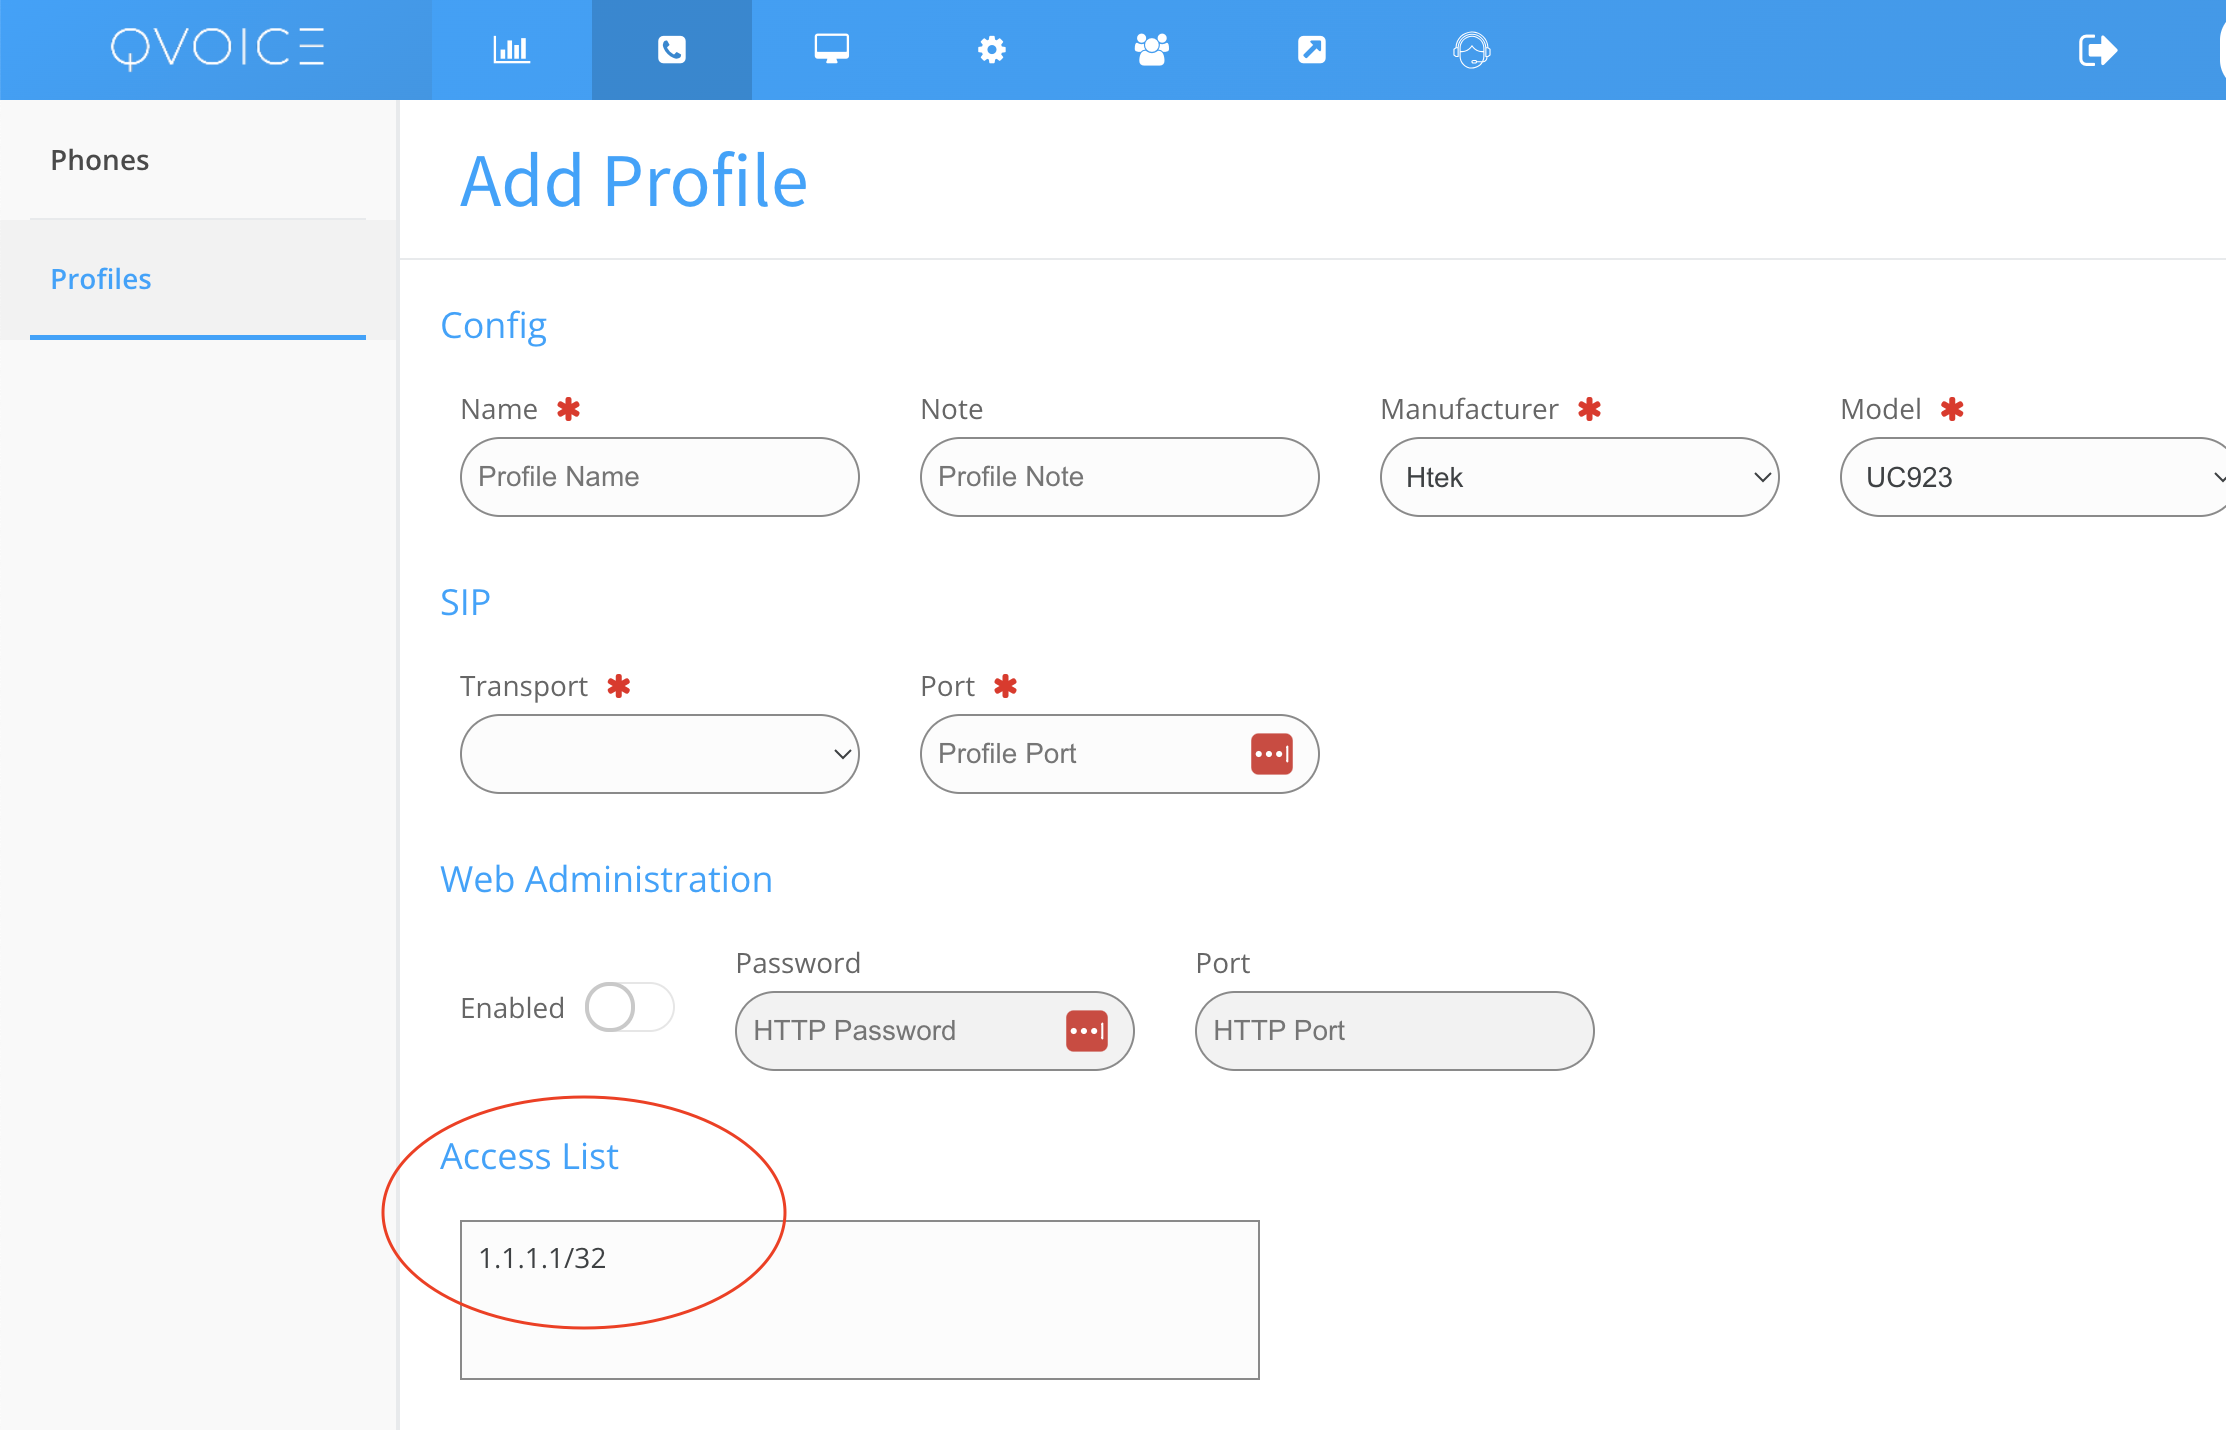
ACL required
HTEK phones are rejected unless the profile ACL includes the phone’s network or its IP address (with subnet mask). Add the office LAN or the phone’s static IP before unlocking.
How to set up
- Create an Htek Profile with ACL entries for the deployment network.
- Add each Phone by MAC, assign users, unlock devices.
- On the phone, set provisioning to the HTTPS or TFTP URL above.
- Reboot the phone.
Mitel
Provisioning URL: https://qvoice.net:9443/provisioning/mitel
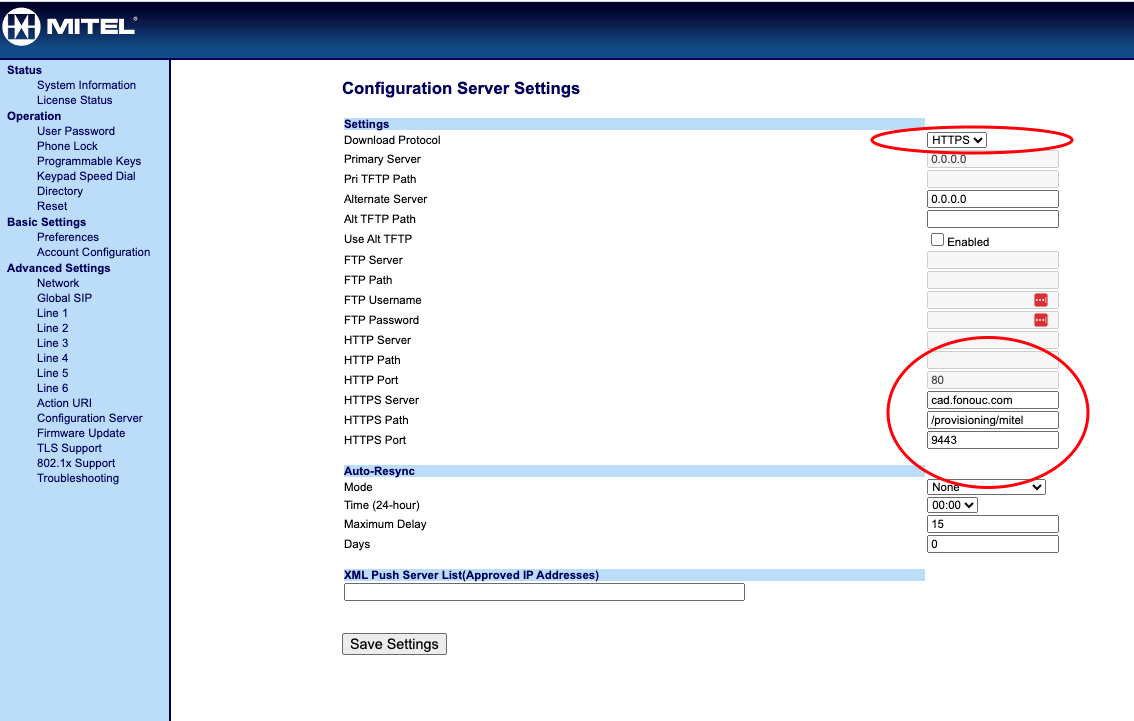
Configuration server (phone GUI)
| Setting | Value |
|---|---|
| Protocol | HTTPS |
| Server | Your platform hostname |
| Path | /provisioning/mitel |
| Port | 9443 |
Advanced → Network
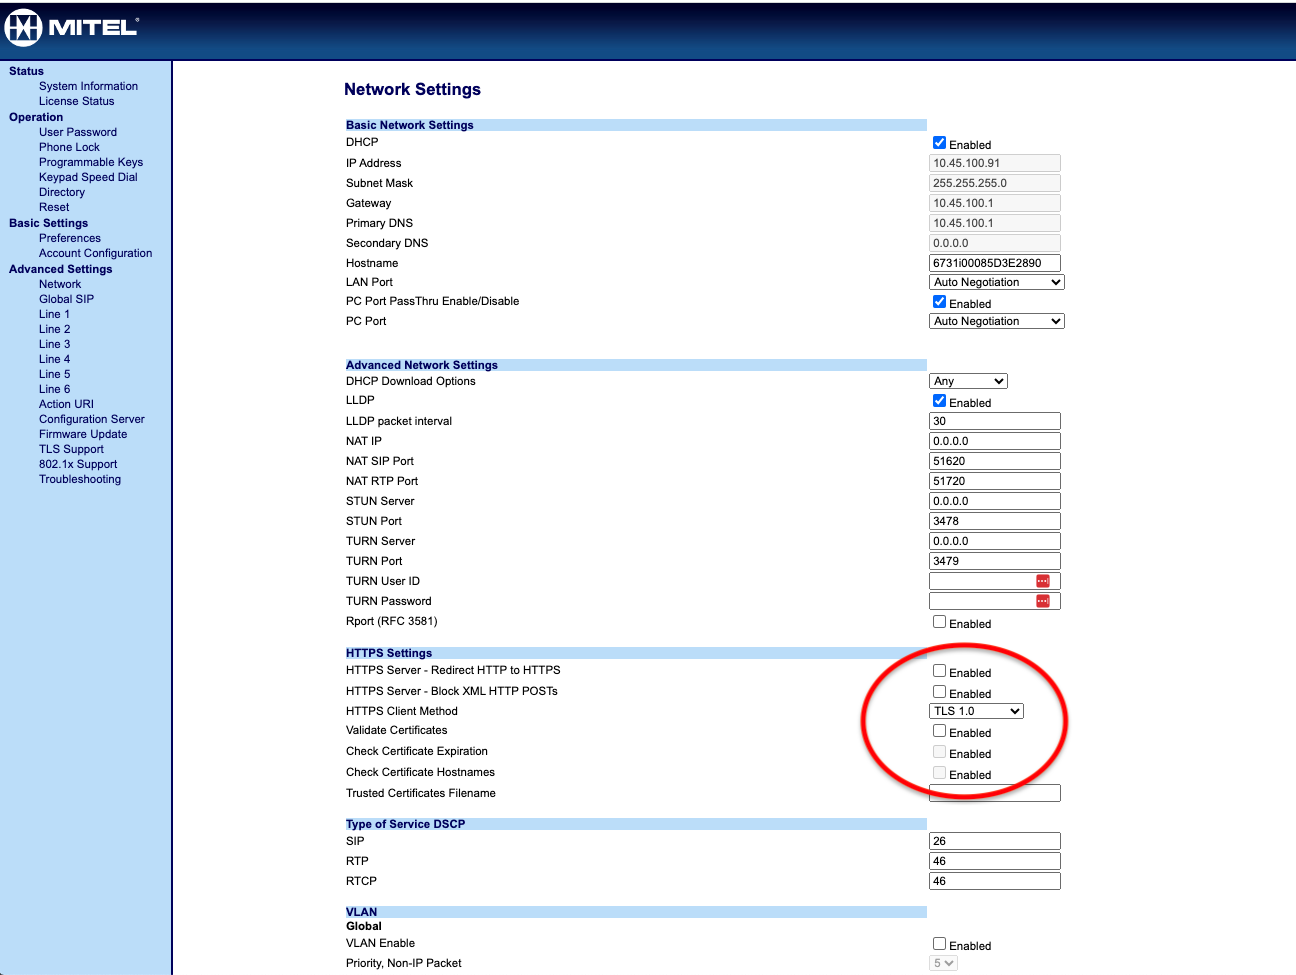
| Setting | Value |
|---|---|
| HTTPS Client Method | HTTPS |
| Validate Certificates | False |
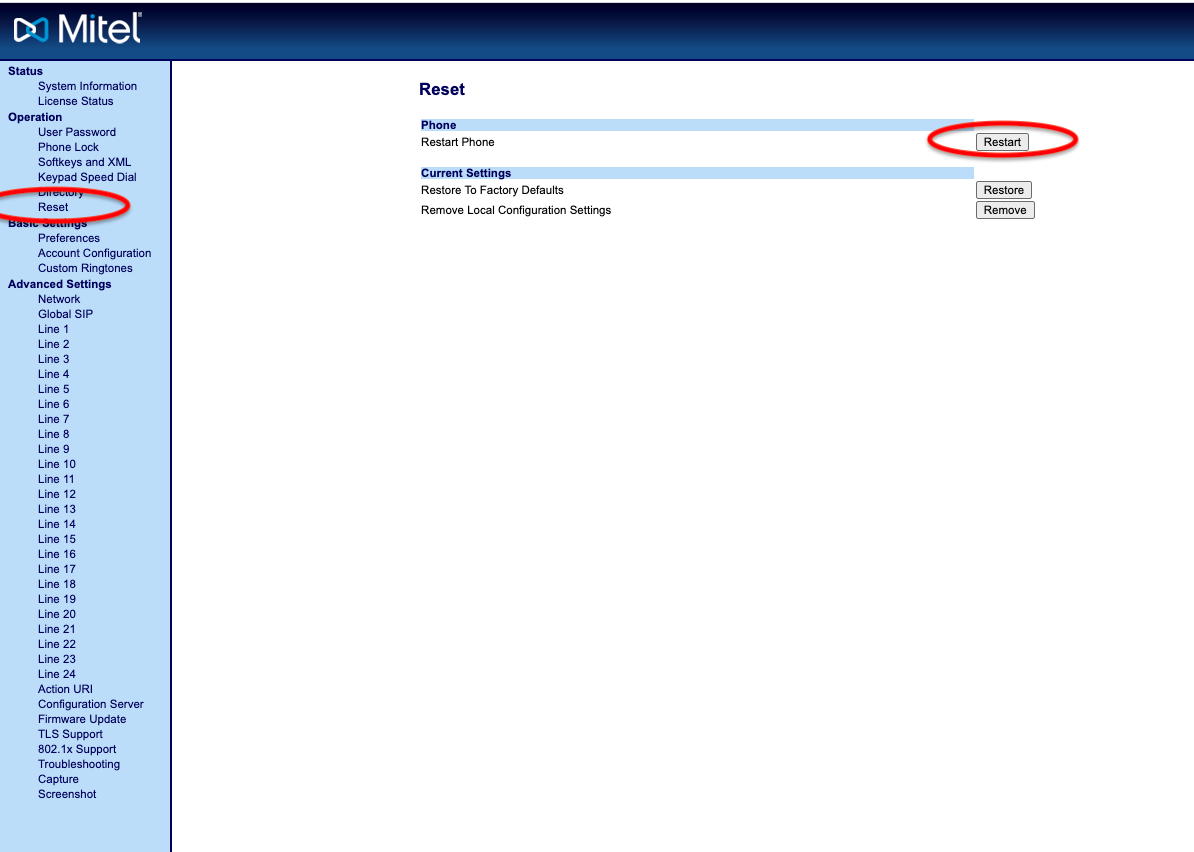
Restart the phone after saving so it downloads configuration.
Screenshot gallery: Click any thumbnail to zoom.
|
|
|
Cisco
Cisco models 7912, 7940, 7960, and 7962 are supported for profiles, programmable keys, and config preview in the portal. There is no dedicated HTTPS auto-provisioning endpoint; export or copy the generated configuration from the portal and apply it using Cisco’s supported method for that model (TFTP, web upload, or manual entry).
Suggested screenshot: Portal config preview for a Cisco 7962 (phone-system/cisco-config-preview.png).
4G IP Phone
Model S01 is supported for portal profiles and button programming (10 programmable keys). Use the portal Preview config output and apply it on the device per the manufacturer’s instructions.
Suggested screenshot: Portal profile for 4G IP Phone S01 (phone-system/4g-ip-phone-profile.png).
Yeastar (TA FXS gateway)
Provisioning URL: https://qvoice.net:9443/provisioning/yeastar
Yeastar TA FXS analog gateways pull XML configuration over HTTPS. Register the gateway in the portal with its MAC address (no colons). Assign a user extension for each FXS port. Buttons layouts apply to desk phones only, not gateways.
Gateway web GUI — System → System Preferences → Auto Provision Settings
| Setting | Value |
|---|---|
| PNP | No |
| DHCP | No |
| Server URL | Yes |
| Server URL | Full URL: https://<your-hostname>:9443/provisioning/yeastar/ — include https://, port 9443, and the path (trailing slash recommended). The UI may truncate display; verify the saved value is complete. |
| Username / Password | Leave blank |
| AES Key | Leave blank (plaintext XML) |
| Always Apply | Yes while testing; No in production to skip identical configs |
The gateway requests cfg{mac}.xml appended to the Server URL (MAC lowercase, no colons). After the first successful provision, the Server URL may include a phone UUID in the path (for example …/provisioning/yeastar/05c8cc75-95e8-4185-b217-1c0904ed828a/); that is expected.
SIP registration per FXS port
Each assigned port is modulestatus=up in the downloaded XML. User Name and Authentication Name on the gateway must both be the Kazoo device SIP username from the portal (e.g. user_GL8ugPPs01), with the device password. Do not put the user extension (e.g. 1001) in the SIP username fields — registration to the platform will fail. One portal line per FXS port (1:1).
The shared VoIP trunk uses the account realm for domain and host (e.g. onedemo.cloudphone11.com), enableregister=portregister, and UDP port 5060 unless the provisioning profile specifies another port or transport. Dial pattern is .,, (send all digits).
How to set up
- Create a Yeastar Profile (manufacturer Yeastar, model TA100 … TA3200 matching your hardware) and a Phone for the gateway MAC; assign users per FXS port; unlock the device.
- On the gateway, configure Auto Provision Settings as in the table above.
- Set Interval or Specified time, then Save and Apply Changes (top bar). Wait for the next scheduled run (reboot alone does not trigger Server URL provisioning).
- Use Preview config in the portal before unlock when available.
TLS
Provisioning uses HTTPS on port 9443. Some TA firmware requires legacy TLS ciphers on the platform; if the gateway never completes TLS, contact your platform operator.
Suggested screenshot: Yeastar web UI — Auto Provision Settings with full Server URL (phone-system/yeastar-auto-provision.png).
Related topics
- Cloud Phone System Admin — platform overview
- Account Settings — account-wide phone behavior
- Legacy HTEK TFTP notes:
phone-system/tftp-htek-provisioning.md(orphan page; HTTPS method above is preferred)